LED rows for the neck

The H015 droid needs to provide access to the electronics. This could be either through a hole in the bottom plate, or through the neck. The former does not sound like a good idea. In particular, once the antennas are in place it will be a pain to turn the droid upside down. The latter requires the head to be removable – this requires some precise work, to ensure that the head sits straight, without being able to wiggle in its slot.

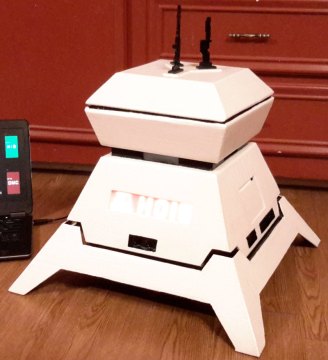
The original H015 in TFA features some lights in its neck. In the movie, the lights in the neck appear to be blue (at 20:58). In another scene (at 1:36:24) they also seem to be red. Although this might be some reflection, we will use red and blue lights. For this purpose, we use sets of three RGB LEDs, for which only the red and blue elements will be connected. The LEDs are mounted behind some matte white transparent plastic (taken from a gallon bottle of vinegar), to make the lights from the individual LEDs blend into each other. From the appearances in the movie one cannot tell on which sides the LED rows are. We put them on the front, and on the left and right sides.

We start the neck structure with two layers of cardboard to which the plastic pieces are glued. Five more layers of cardboard are added to provide support for the head.

The structures for the LEDs are made from pieces of cardboard, glued to popsicle sticks. These are painted black, and glued to the inside of the neck. Now we cut out the opening at the top of the body which provides access to the inside of the droid.

Four corner pieces (made of three layers of cardboard are then glued to the head. This step requires high precision – otherwise the head may not sit straight, it may have space to wiggle, or it may not fit at all.

After removing the cardboard at the bottom of the droid, the final shape becomes visible.
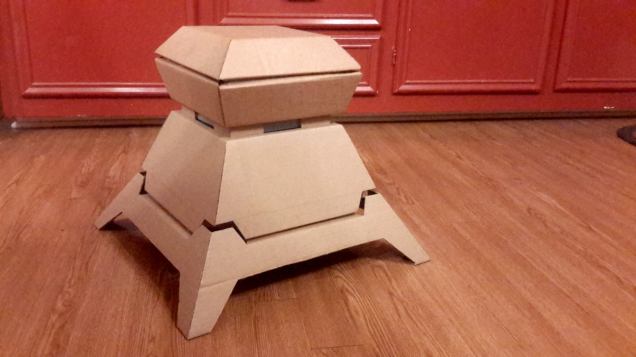
h028

Yeah!

Head and body

We start from the top. Let’s get our notes, a pencil, rulers, a knife, cardboard, and a piece of wood for cutting.

h001

H015’s head is made of two pieces which will both be glued to a ring. First, the upper head piece is glued to the ring, and temporarily fixed by some metal clips. We cut a hole in the bottom piece and glue it in the same way onto the ring.

This is the head.

Now we cut out the upper and the lower pieces of the body.

These pieces need a little larger separation, so we glue two rings on top of each other.

Then we glue the upper body piece to the rings …

and add some pieces of cardboard as support for the corners.

For the bottom piece we glue the support in the corners first, …

cut a hole in the baseplate, and glue the bottom piece to the rings.
Afterwards we cut out the lower pieces, so that the legs become visible.

At this point, the beautiful shape of the H015 droid becomes already visible. I love that – that’s why I wanted to build it in the first place!

Goals and Plans

Before starting the build, it’s time for some general thoughts:

I really, really love the appearance and the shape of the H015 droid.
However, the original size (the baseplate is 70cm x 70cm) is a little too large for my purposes. I want this droid to go together well with my astromech droid R3-B9 (built at approx. half of R2-D2’s size) and my mousedroid MSE-6c (built at 90% of the size of the original). So, I decided to build this one at 70%, making the baseplate 49cm x 49cm, and the height 41cm.

Like the original mousedroid (which moves and makes sounds, but has no other effects), the H015 droid is also rather limited in its functions. In the movie it moves and it can have a blue or red light on the front side. For my robots, I want them to be a little more fun than that, so I aim for a few additional functions. My MSE-6c got an ultrasonic distance sensor (which helps him to brake in front of obstacles), and 4x 7-segment display (which displays the distance to the closest object), and a blue and red LED row on the front side.

I am planning to add similar features to the H015 droid. So, this won’t be an exact replica, neither in size, nor in the details. And like my other droids, I am also planning to build this one from cardboard. With this in mind, I have created the following plans. These plans are not exactly up to scale. So, one can not simply enlarge these, but has to redraw everything on the cardboard. A great source of free large sheets of robust corrugated cardboard is Sam’s Club (they use this to separate layers of kitchen towels or toilet paper).

The head and the rest of the body are each made out of two pieces. These two pieces are both glued to a connecting ring which is made out of one layer of cardboard for the headpieces, and two layers of cardboard for the body pieces.

Here are the plans for the two head pieces, and for the connecting rings,

… and for the upper and lower parts of the body.

Later, I will insert a piece of wood inside the body, to mount the motors and caster wheel(s).

Measurements

In the first step, I obtain the all relevant measurements of the H-015 droid. All of these are based on the images from the books “Star Wars: The Force Awakens Visual Dictionary” and “The art of Star Wars: The Force Awakens”. The comparison with the person is used to determine the absolute height of the droid.

H015-person

The droid is one third of the size of the person. Assuming the person to be 70″, this gives a height of 23 1/4″ (without the antennas). The absolute height is then used to scale the relative vertical measurements from the next image, in order to obtain the absolute vertical sizes.

H015-vertical-b.png

In the next image, the droid is shown approximately from an angle of 45 degrees. The horizontal measurements of the diagonal widths are divided by sqrt(2) to convert them into the lengths of the sides. The ratio of these lengths and the height (in this image) is then multiplied with the known height which provides the absolute widths, as indicated in the image.

H015-width

The height (23 1/4″) and the width at the bottom (27 9/16″) are in agreement with the values that are mentioned by savagecreature in his Build log at rebeldroids.com.